This is a re-post of something I wrote for another website in April 2016. I don’t do that much 3D printing anymore, but I certainly learned a lot during that time!
I’ve spent the past 5 years building 3D printers and using them to make things. In the process, I’ve found a new career, and learned a lot about what 3D printing can do, and what its potential is. I like to say that in this sense I’m living a few years in the future: 3D printing is working well enough for me that it is part of my day-to-day life. From my perspective living in the near future, I’d like to share some of the key things I’ve learned, and what it implies going forward.
I originally wrote and published this article on June 4, 1999 on this very site, villamil.org, more than 20 years ago. I’m reposting it as-is, including some very dated references.
This is an idea that is gaining a great deal of currency lately, as many business leaders and entrepreneurs point out the key role of science fiction books and media while they were growing up.
However, I did receive a very interesting comment on this and other pieces, which is worth highlighting. While traveling in India in 2001, I met a group of Spanish civil servants on vacation, and I shared a link to this piece in its original form. They read it, and their response has stayed with me: they basically said that I was clearly very passionate about the subject, but all my essays skewed towards pointing out the monetary value of things. If I enjoyed something, that is enough – I didn’t need to justify it by using it to make money.
Image by David Revoy / Blender Foundation – Obra proprie, CC BY 3.0
Recently, my friend Nick attempted to describe my job: he said he thought of me as a sort of “arsey clerk”. After an awkward pause for reflection, it occurred to me that he had intended to compare me to Arthur C. Clarke, the science fiction writer who invented/predicted geostationary communications satellites. (For the sake of our friendship I’ll continue to assume this interpretation.)
By comparing me, a strategy consultant, to a science fiction writer Nick was making an interesting point: in many industries, science fiction (or the science fiction approach) is potentially an extremely valuable way to approach the challenge of planning for an uncertain future, and exploring possibilities which may uncover new opportunities.
It is important to understand what “proper” science fiction is, and how it differs from the rest of literature. The best science fiction has at its core a key idea, which is explored through the story. This idea is frequently expressed as a “what if”: what if computers became intelligent, what if computers had been available 100 years ago, what if people could no longer lie to each other, what if chopsticks carried animated advertising, etc… Characterization, description, plotting are secondary in all but the best. There are other books and films classified as science fiction that are simply conventional literary genres dressed up in spacesuits and rocketships. I would class these as fantasy.
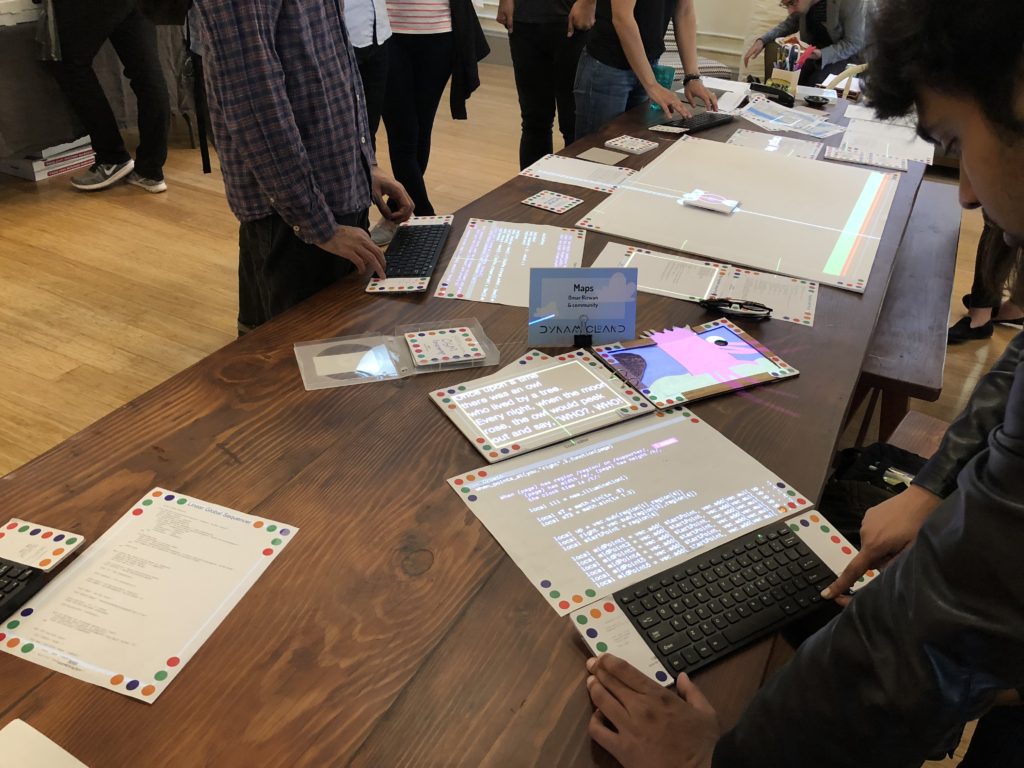
I recently had the opportunity to visit Dynamicland, an extremely interesting project under way in the middle of Oakland.
Dynamicland describes itself as “a new computational medium, where people work together with real objects in physical space…” but what is it, really? In practice, it is an entire building that has been comprehensively equipped with computer vision cameras and projectors, with a software platform that integrates everything. Almost every flat surface (tables, floors) and wall can detect objects, and animate them. It is intended as an environment in which to build applications, and in fact all of Dynamicland is built and maintained using its own tools.
However, the most important thing about Dynamicland is not the technology, but rather how it enables (and leverages) very natural interactions in a collaborative way. By the end of the evening, visitors were explaining Dynamicland to each other, and trying out various experiments.
Everything with a colored dot is a Dynamicland object.
There is a lot to unpack here. Over the course of 2 hours I had a chance to play with various demos, talk to the team there, and started to get a sense of the possibilities. I’ll describe what it was like, then share some thoughts on execution, philosophy and the future. Nothing compares to actually visiting and experiencing it for yourself, but I hope to pique your curiosity!
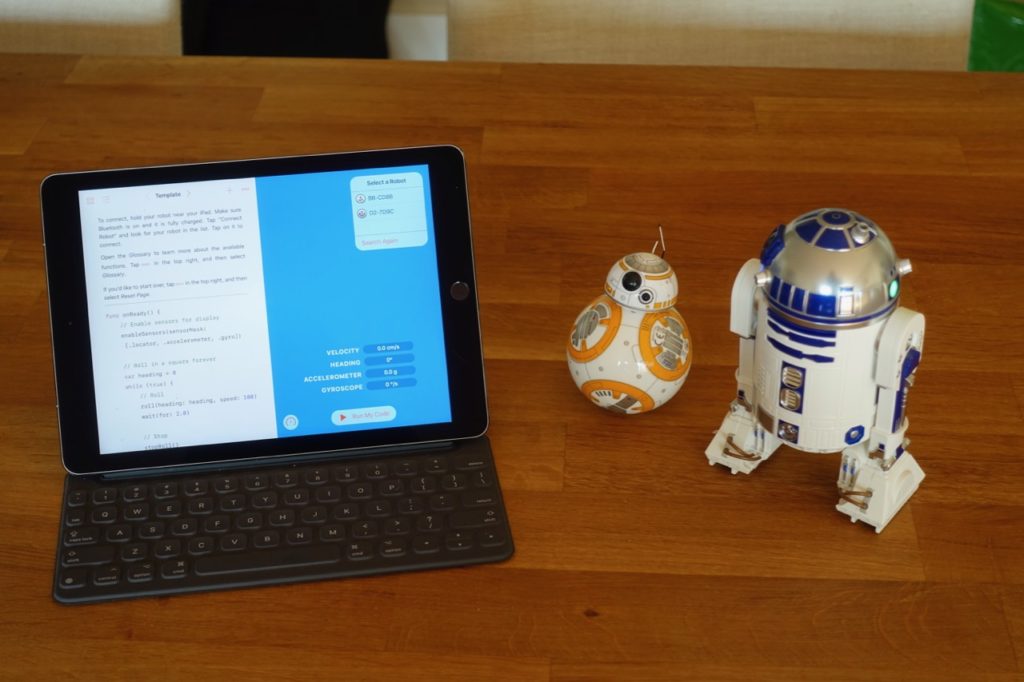
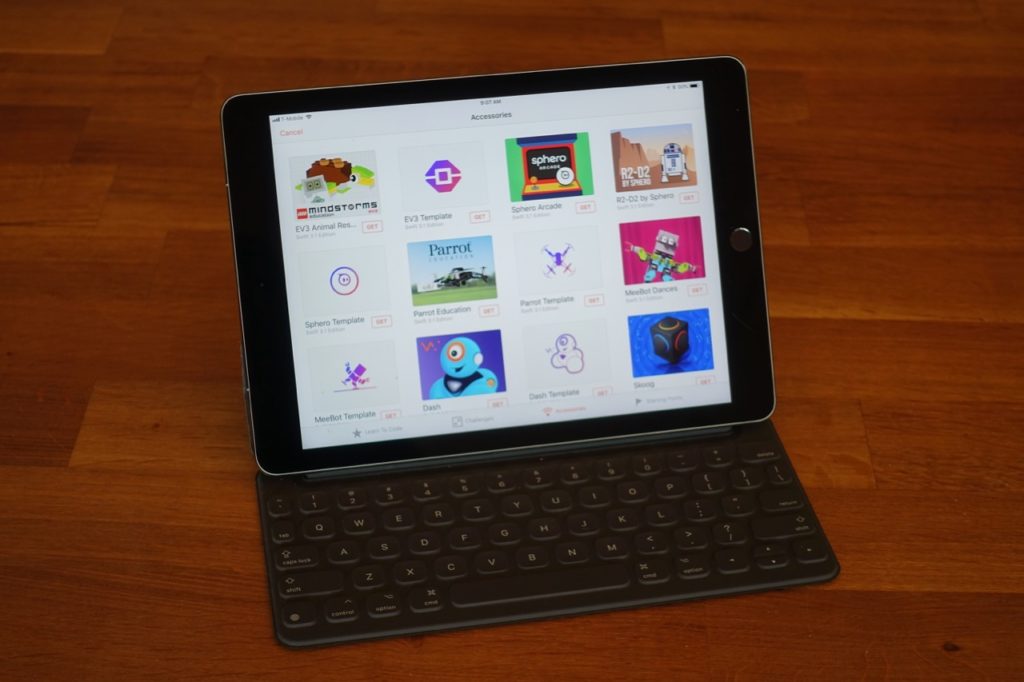
What if you could use a single programming environment to learn to code at an early age, then use that same environment to explore programming for robots, IoT, Augmented Reality, and then take those projects into a full-blown programming environment? Apple’s Swift Playgrounds is a free app that aspires to do all of these things. I spent some time working with their new features for controlling educational robots, and here is what I found.
The Swift programming language was introduced in 2014, along with a feature called Playgrounds in Xcode, Apple’s main developer tool. The Swift Playgrounds app for iPad was introduced in 2016 as a “learn to code” environment aimed at children, but it is very much real programming. This spring (2017) it received substantial updates, including the ability to program several educational robots,
I spent some time using Swift Playgrounds with these robots:
Other robots are supported, including Parrot drones and Meebot, but I didn’t have a chance to test them.
What I found is a VERY promising beginning. The core Swift Playgrounds tutorials (Learn to Code) are really solid, and provide for a seamless transition into robotics. The robotics support is good, even though the level of finish and polish is variable. The ability to bring projects into XCode (Apple’s IDE) is an important bonus, and opens the path to more sophisticated projects.
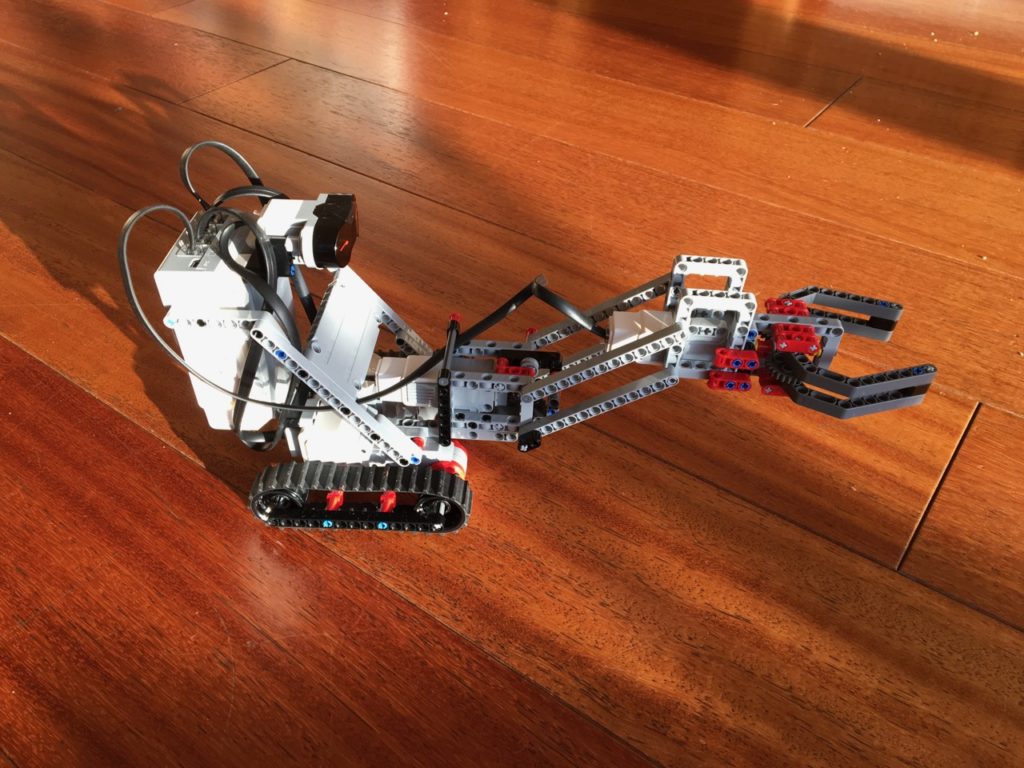
Lego Mindstorms is very polished, with a useful Live View, and very complete support for the API. Documentation is extremely thorough. You can do everything you can do with the Lego software. It feels like an advanced step for students used to the Lego apps.
Wonder Workshops Dash is also well designed, but it seems like the API support is limited. It feels like you can only use the robot to a fraction of its capabilities, it may benefit from further api testing to maximize the capabilities of the API and robots communication. The tutorials are very easy, but without much of a growth path. It feels like an extension to basic Swift tutorials, instead of using this tool as a way to explore more advanced concepts.
The Sphero playgrounds are very solid, with complete API support, Live Views, and thorough documentation. Well structured Star Wars themed tutorials for the R2-D2 robot, and more general tutorials for the entire Sphero product line. This also feels like an advanced step past the native apps.
I’ve been spending some time making stuff with Lego Mindstorms EV3, and have learned some things that might be useful. Out of the box, the kit is extremely complete and most of the materials on-line and in print start with the assumption that ALL you have is the basic kit. However, with a bit of judicious spending, you significantly increase the range of things you can do. (Bear in mind that some of these extensions are not allowed in some competitive robotics leagues, like FIRST.)
Read on for a list of 10 ways to get the most out of your Mindstorms kit!
I’ve spent the past 7 years working extensively with 3D printing, everything from low-cost hobby level printers to very high end plastic and metal 3D printers. I’ve been exploring the elusive space in between, using low-cost printing to serve enterprise and volume production applications. I’ve experienced first-hand how the low cost and high quality of 3D printed parts can change the world.
Here’s my take on the next 5 years in 3D printing.
Innovation by newcomers to the industry will dramatically drive down costs, enabling the move to additive manufacturing
Cost reduction in machines and processes will enable systems capable of volume production
Dramatic innovation in process and materials will also broaden the application space
Existing applications will become cheaper and more accessible.
Entirely new applications will emerge to take advantage of these changes
3D printing will start to encroach on other technologies for some use cases.
However, by far the most important change over the course of the next 5 years will be the decline in the cost of 3D printing. Moreover, this will be driven by newcomers to the industry, many of them coming from the low-cost segment of the industry. This dramatic reduction in cost will shift 3D printing from high value, high cost, low volume applications to low cost, high volume applications. Cost reductions will affect machines, labor cost and materials.
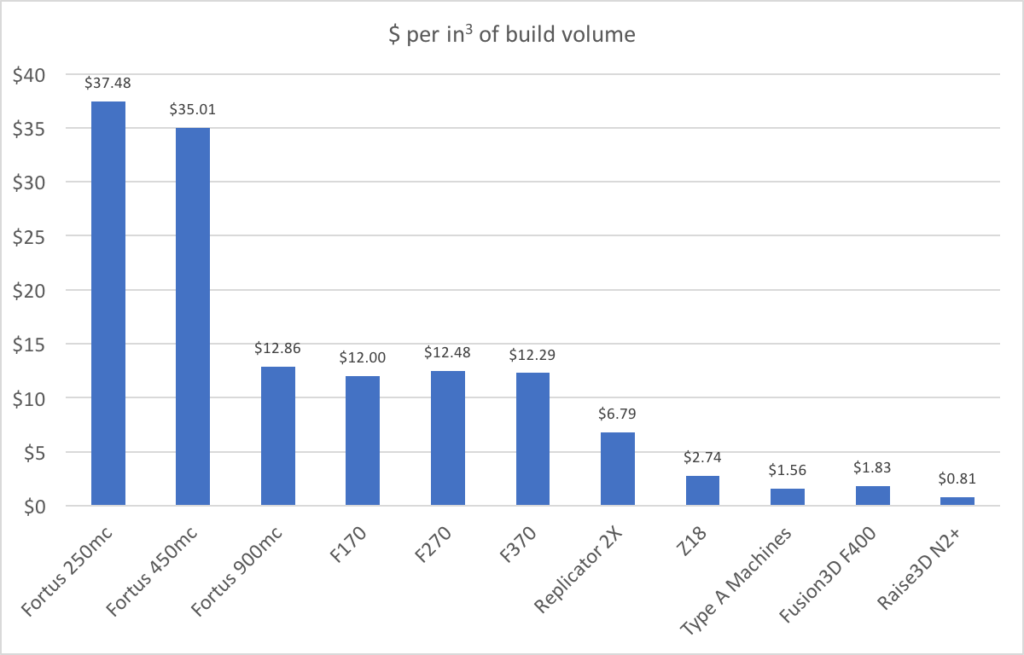
Let’s look at a specific example of cost reduction, comparing high-end “pro” machines using the FDM technology with some that come from the “desktop” space. In order to normalize for size, I’ve compared the price per cubic inch of build volume for various printers:
On the left, two generations of Stratasys 3D printers, the Fortus and F123, all with heated chambers and soluble support. In the middle, the Replicator2X and Z18 are 4th and 5th generation Makerbots. On the right, competitive low-cost printers built for robust applications. It is worth pointing out that that the Raise3D N2+ has a build volume comparable to the Fortus 450mc, dual extruders and network control – for 1/40th of the price.
I have been working on a project with Lynn Hershman, called Alchemists Wand for the 21st Century. This art piece incorporates a number of brooms that have been modified to detect toxic substances, registering this on LEDs embedded in the broom handle, and transmitting their readings to a screen that presents information on what to do. Each broom detects a different substance, currently: alcohol, ammonia, carbon dioxide, carbon monoxide, natural gas and various solvents. The piece showed at Bitforms gallery in New York, as part of a show called “Touch: A Space of Relations”.
Alchemists Wand for the 21st Century at Bitforms gallery
The brief is simple: build a set of brooms that can detect toxic substances in the environment, and display their findings via lights on the broom itself, and on a connected screen. The initial concept design used a square janitor’s broom:
Since October of last year, I’ve been working on an exciting project with filmaker and artist Lynn Hershman Leeson, an interactive installation integrated with a web-based media database called RAW/WAR. The interactive installation is constantly updated with multimedia from a companion website at rawwar.org.
I’m going to describe some of the aspects that I worked on, especially in the area of physical interface design. We worked with Paradiso Projects extensively for the design and coding of the installation and website software.
The genesis of the project comes from the film “!Women Art Revolution“, a documentary by Heshman about women in contemporary art, and how they created an entirely new, and parallel, body of work from the 1960’s onward. The film is based on over 40 years of interviews with contemporary women artists. However, Hershman realized that it was not possible to present all the stories she had gathered in a single documentary, let alone those of artists she had not been able to document. Therefore, she made available all her original material via an online archive at Stanford University, and created a website, RAW/WAR, that allowed anyone to upload documentation of their story.
For the Sundance Film Festival, Hershman was extremely interested in creating an interactive installation that would allow casual exploration of the RAW/WAR archive in an engaging manner. Starting from an observation about the film, that it was like exploring a dusty attic with a flashlight, we set about bringing this to life.
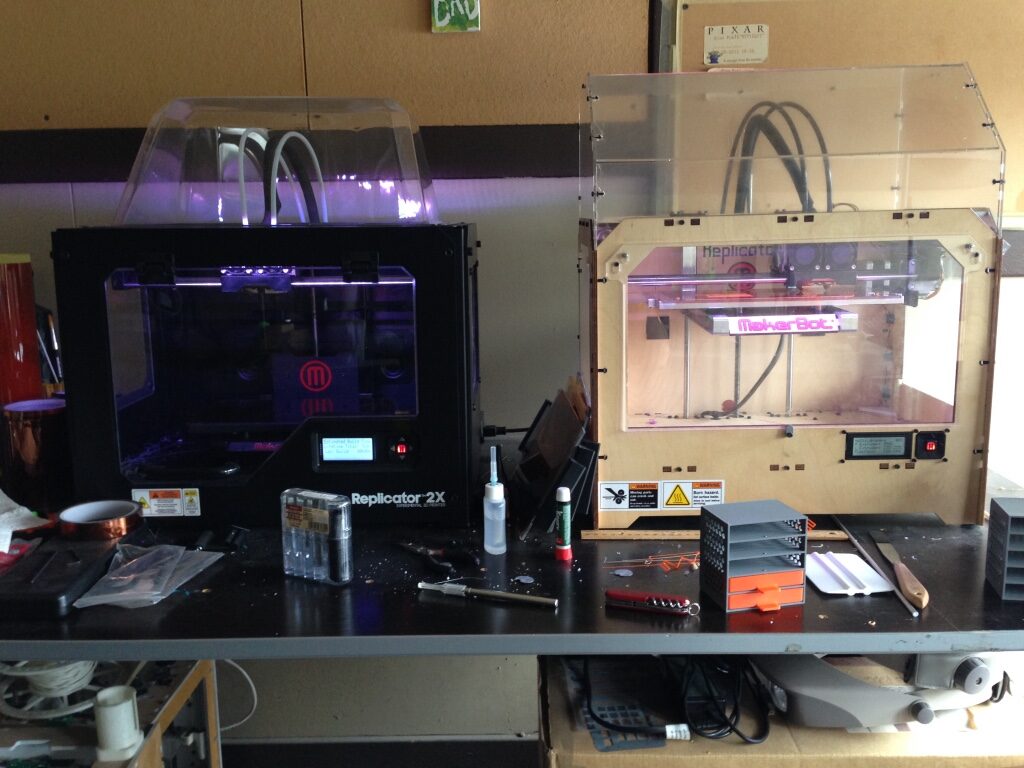
One of the most interesting things about the Makerbot 3D printer is that it can be used to repair, or even upgrade, itself. After a substantial run of large prints, the bushings that hold the X & Y platform had started to wear out, and the print stage was becoming wobbly. This translated into unsightly marks and loss of precision on printed parts.
Fortunately, someone on Thingiverse (a repository for uploaded fabrication files) had already developed a replacement XY stage for the Makerbot, based on the RepRap Mendel, that uses bearings instead of bushings. I ordered the parts (nuts, bolts, bearings) and printed the 18 pieces that make up the replacement stage. The design for the new XY stage has gone through various iterations, with lots of useful changes proposed by the user community. Not only that, but there are even upgrades for the upgrade, as I will discuss later.
Old vs. new XY stages
The new XY stage, mostly printed on the Makerbot, uses bearings instead of bushings, and should experience a lot less friction while moving. The design is also much lower, and allows for more than 1cm increase in vertical travel.
As I was in the process of putting it together, I discovered yet another upgrade for the upgrade: a quick release clamp system for the new XY stage. The print platform is normally held to the XY assembly by magnets, to allow for easy removal. While this makes sense in some circumstances, it can also lead to quite a bit of wobbling. I went ahead and printed two parts as well, and incorporated it to the build.
I have had this Spykee robot for a while now, had encountered some issues, and decided to fix it.
Spykee is a “toy” robot that is suprisingly sophisticated. It has a video camera and microphone, and can be controlled remotely from a computer via local WiFi, or over the Internet. However, it has a design flaw in the battery charging mechanism that overcharges and soon destroys the included battery, getting to the point where you can only operate the robot for 10 minutes. The built-in WiFi antenna is cheap – a piece of PCB with etched traces – so the range is very poor.
Spykee with new WiFi antenna and external battery
I fixed both of these issues very quickly: for the WiFi range issue, I ordered an RP-SMA to UFL pigtail connector. This is a fancy wire that connects to the WiFi connection on the robot’s motherboard on one end, and to an external WiFi antenna on the other. I ordered this one. Disassembled the robot, unplugged the internal WiFi antenna, and plugged in the pigtail. Drilled a hole in the case, on the left side near the top, and threaded the RP-SMA connector through. The antenna, from a defunct D-Link router, just screwed on. You can probably use higher power antennas as well, as long as it has an RP-SMA connector.
I wanted the mod to be as reversible and low-impact as possible, so I looked at the battery connector inside the robot (Tamiya style), cut the equivalent battery-side connector off a dead battery, and soldered it via some wires to a standard 2.1mm power jack from Radio Shack. I drilled a hole in the robot case to accomodate the jack, and plugged the other end into the robot’s existing battery connector. The battery attaches to the robot using Velcro adhesive strips. I can revert to the “factory” configuration by just unplugging the new cable, and plugging in the old battery.
One disadvantage of the LiPo pack is that you cannot use the existing charging dock, you have to connect the LiPo battery’s own charger. The robot has some nifty functionality for auto-docking, so this is a bit of a loss. Since the battery is connecting via the existing circuit path in the robot, it should be possible to adapt the LiPo charger to connect through the robot’s charging dock. Haven’t gotten around to doing this yet. (Warning: LiPo batteries require a lot of care when charging. Use only the charger that comes with it. Don’t do this if you don’t know what you are doing.)
Javier and the robot
Results of all this? The robot can now be run very actively for over two hours at a time, at high speed. WiFi range is roughly 25% better, the robot can now roam freely all over the apartment without losing the connection. It is now a far more practical proposition to use the robot to play with my son!


Science Fiction as a tool for planning (the view from 20 years ago)
I originally wrote and published this article on June 4, 1999 on this very site, villamil.org, more than 20 years ago. I’m reposting it as-is, including some very dated references.
This is an idea that is gaining a great deal of currency lately, as many business leaders and entrepreneurs point out the key role of science fiction books and media while they were growing up.
However, I did receive a very interesting comment on this and other pieces, which is worth highlighting. While traveling in India in 2001, I met a group of Spanish civil servants on vacation, and I shared a link to this piece in its original form. They read it, and their response has stayed with me: they basically said that I was clearly very passionate about the subject, but all my essays skewed towards pointing out the monetary value of things. If I enjoyed something, that is enough – I didn’t need to justify it by using it to make money.
Recently, my friend Nick attempted to describe my job: he said he thought of me as a sort of “arsey clerk”. After an awkward pause for reflection, it occurred to me that he had intended to compare me to Arthur C. Clarke, the science fiction writer who invented/predicted geostationary communications satellites. (For the sake of our friendship I’ll continue to assume this interpretation.)
By comparing me, a strategy consultant, to a science fiction writer Nick was making an interesting point: in many industries, science fiction (or the science fiction approach) is potentially an extremely valuable way to approach the challenge of planning for an uncertain future, and exploring possibilities which may uncover new opportunities.
It is important to understand what “proper” science fiction is, and how it differs from the rest of literature. The best science fiction has at its core a key idea, which is explored through the story. This idea is frequently expressed as a “what if”: what if computers became intelligent, what if computers had been available 100 years ago, what if people could no longer lie to each other, what if chopsticks carried animated advertising, etc… Characterization, description, plotting are secondary in all but the best. There are other books and films classified as science fiction that are simply conventional literary genres dressed up in spacesuits and rocketships. I would class these as fantasy.
Continue reading Science Fiction as a tool for planning (the view from 20 years ago)